When developing a new AI app, the race to launch can define its success. Being the first to market often secures a significant advantage, while delays can lead to missed opportunities and financial losses. However, coding an AI application from scratch requires skills and resources that not everyone possesses.
Enter no-code platforms like Bubble.io. These platforms empower entrepreneurs and business owners to create robust web applications without writing a single line of code. This accelerates the development process by 10x, allowing for rapid product launches without compromising on quality or functionality. Through Bubble.io, anyone can bring their ideas to life, and it is the best time right now to launch an AI SaaS on Bubble.io, riding the AI wave.
This guide will demonstrate how to integrate the OpenAI API with Bubble.io and build your first AI software on Bubble.io, similar to ChatGPT.

What is bubble.io
Bubble.io is a no-code platform that lets anyone build web applications without needing any coding skills. It provides a drag-and-drop interface that allows you to build your app quickly and efficiently. With Bubble.io, your creativity is your only boundary; it can create complex web applications from B2B SaaS to social networks.
What is OpenAI?
OpenAI is an artificial intelligence research lab that aims to create safe AI that benefits humanity. They offer several powerful APIs, including GPT-3 and GPT-4, which can be used to generate human-like text. Their recent update and release of the GPT-4 Preview API can understand and respond to natural language queries with the highest quality, at lower costs.
How to integrate OpenAI API to Bubble.io?
To integrate OpenAI with Bubble.io, please follow these steps:
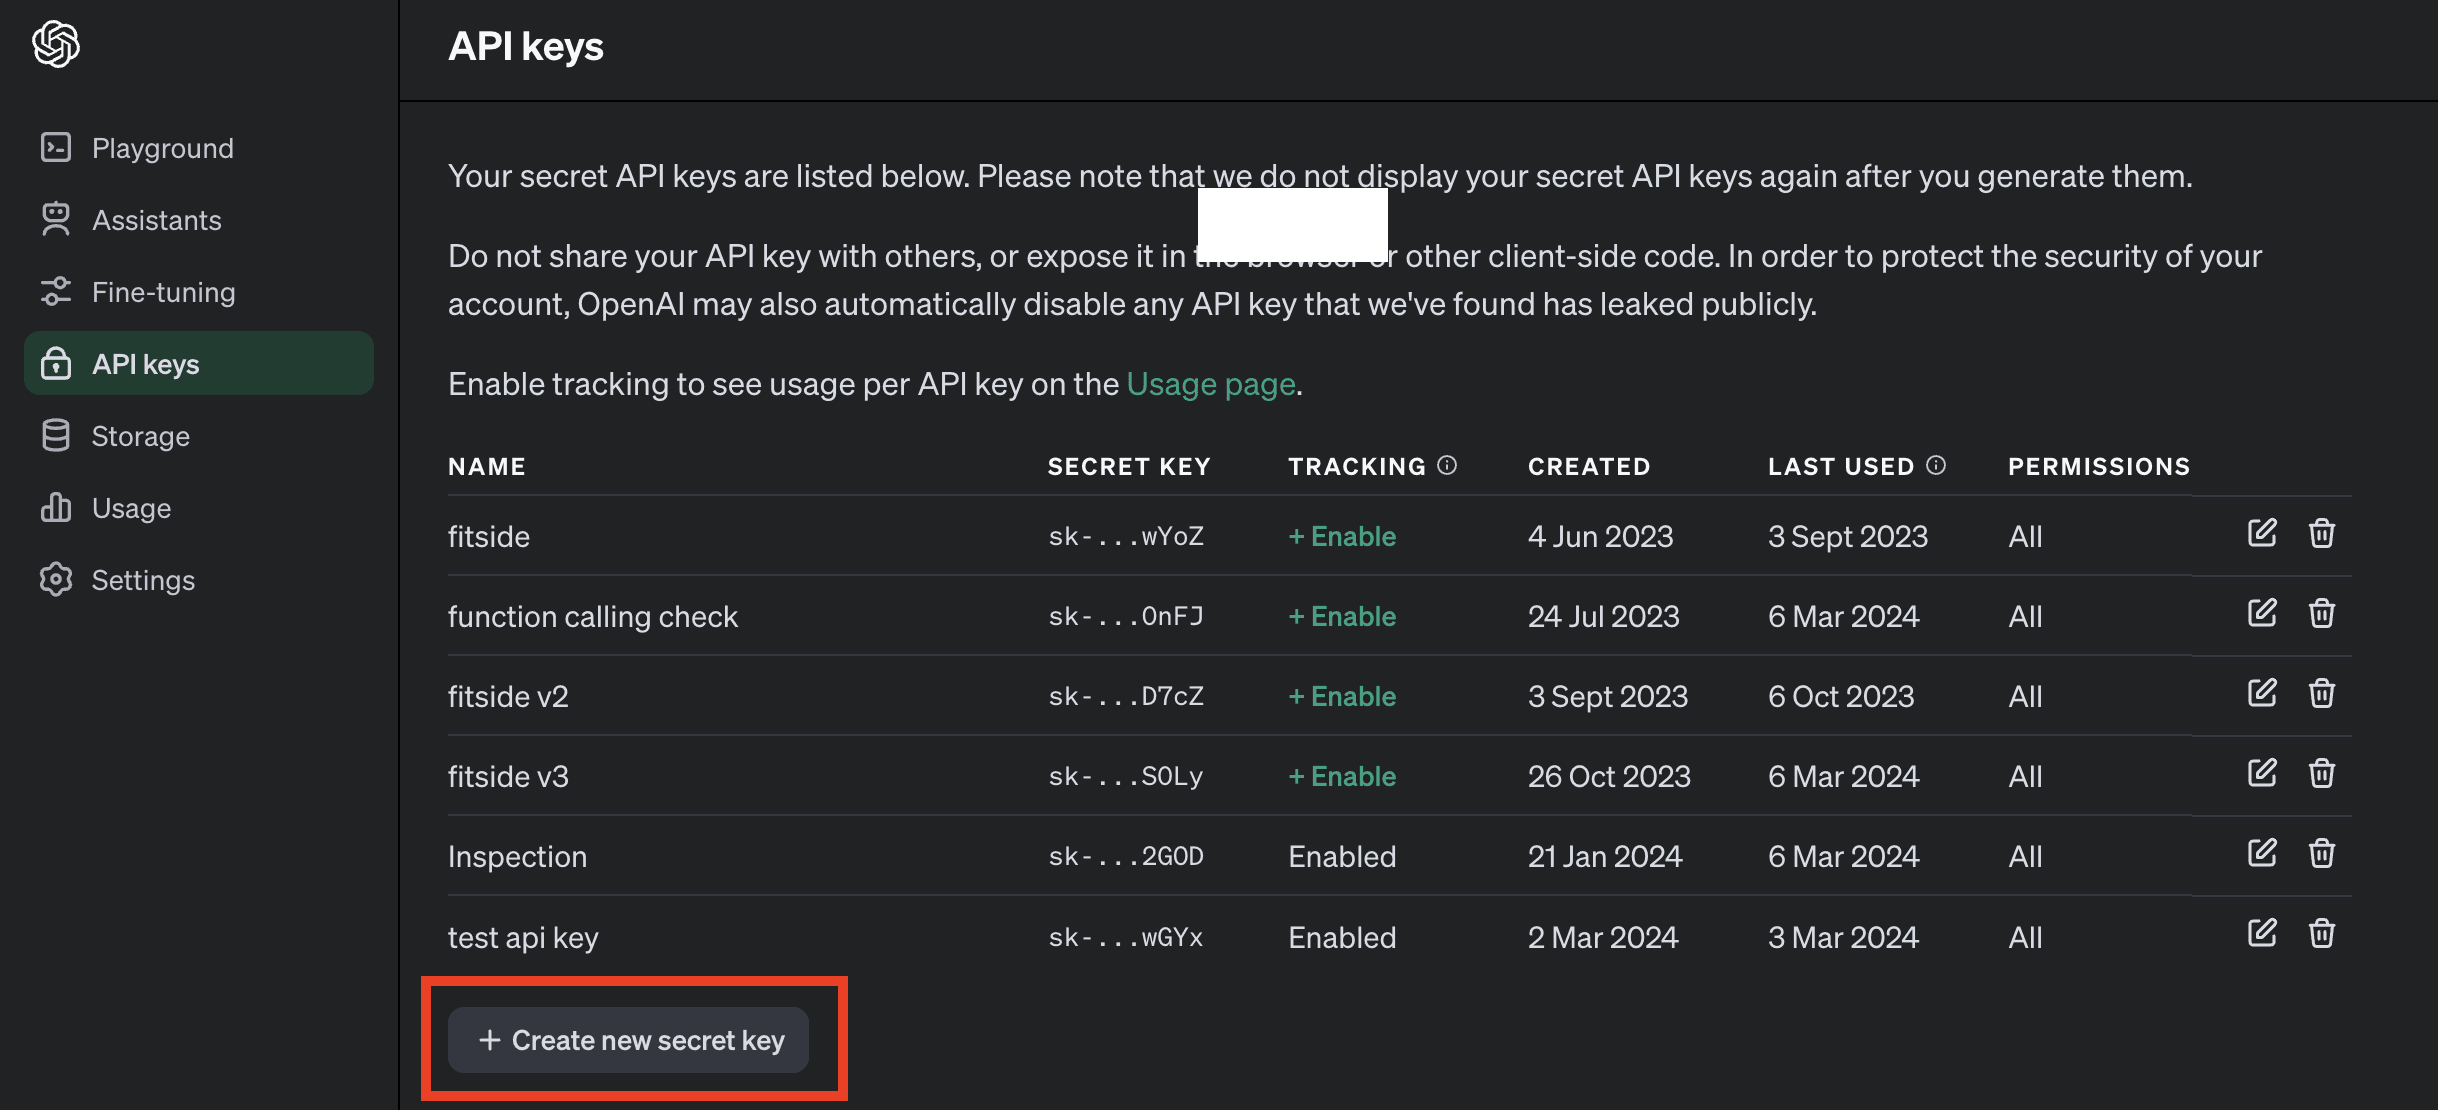
Step 1: Sign up for OpenAI and create a new OpenAI API key. You can simply create an account with your email address and password. Check out the link here to sign up:
API Keys / Signup: https://platform.openai.com/account/api-keys
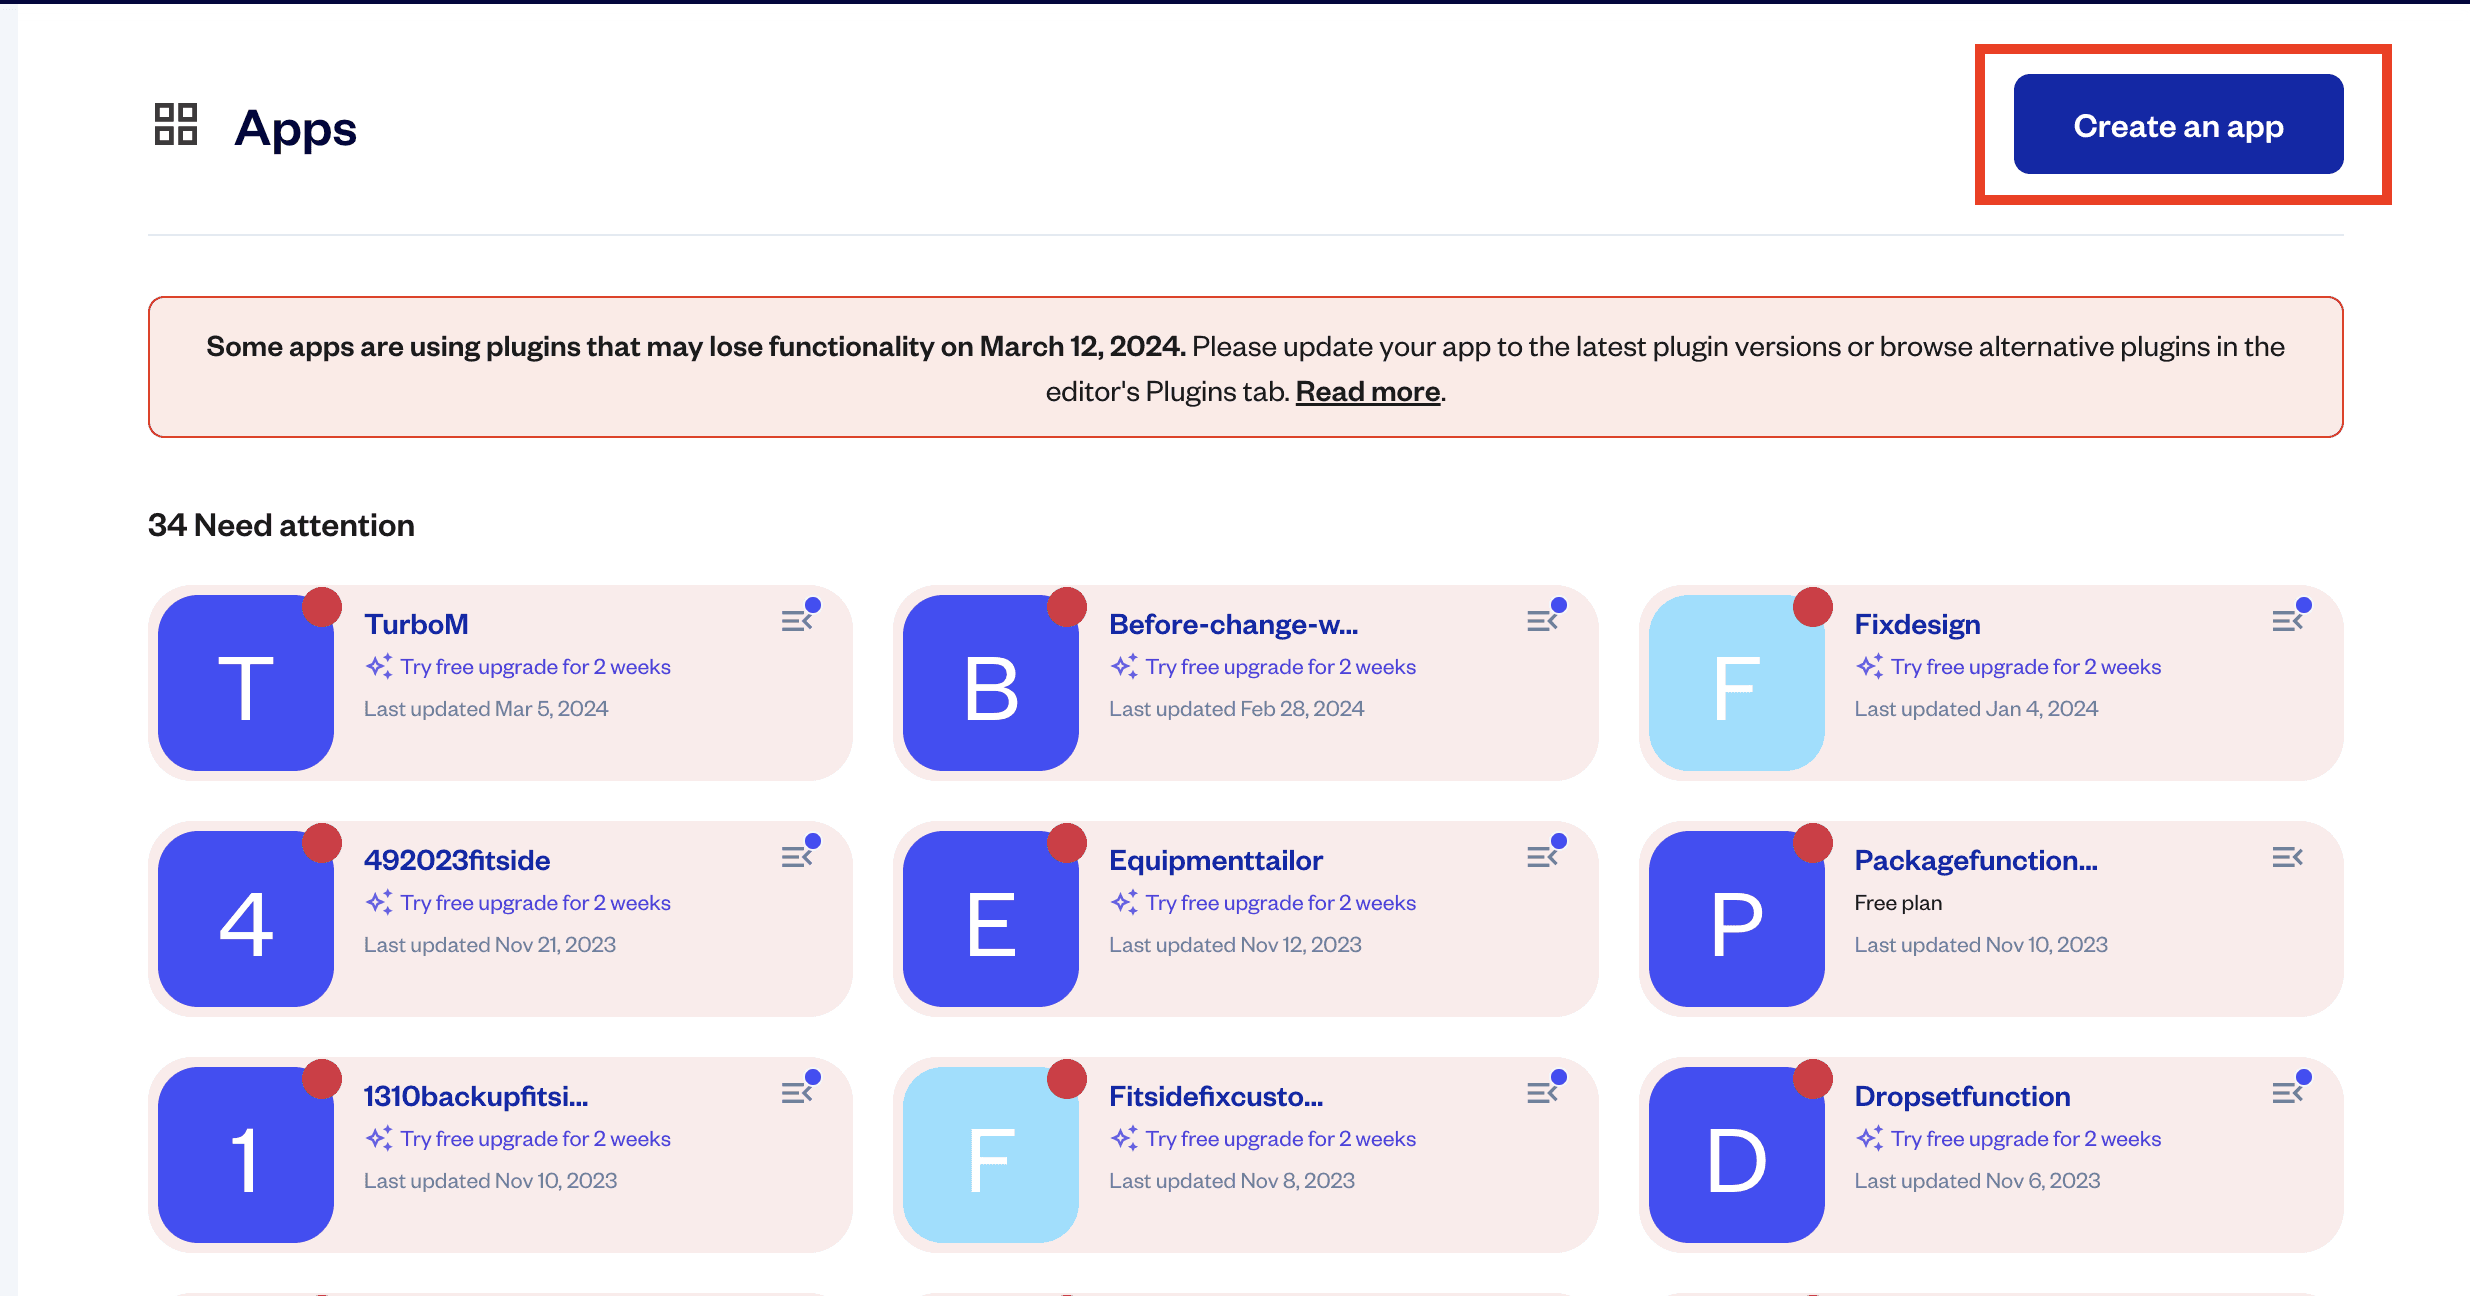
Step 2: If you haven’t already, create a new Bubble account; it is free as well. Simply create an app by clicking on the 'create an app' button highlighted in the image.
Signup: https://bubble.io/login?mode=signup
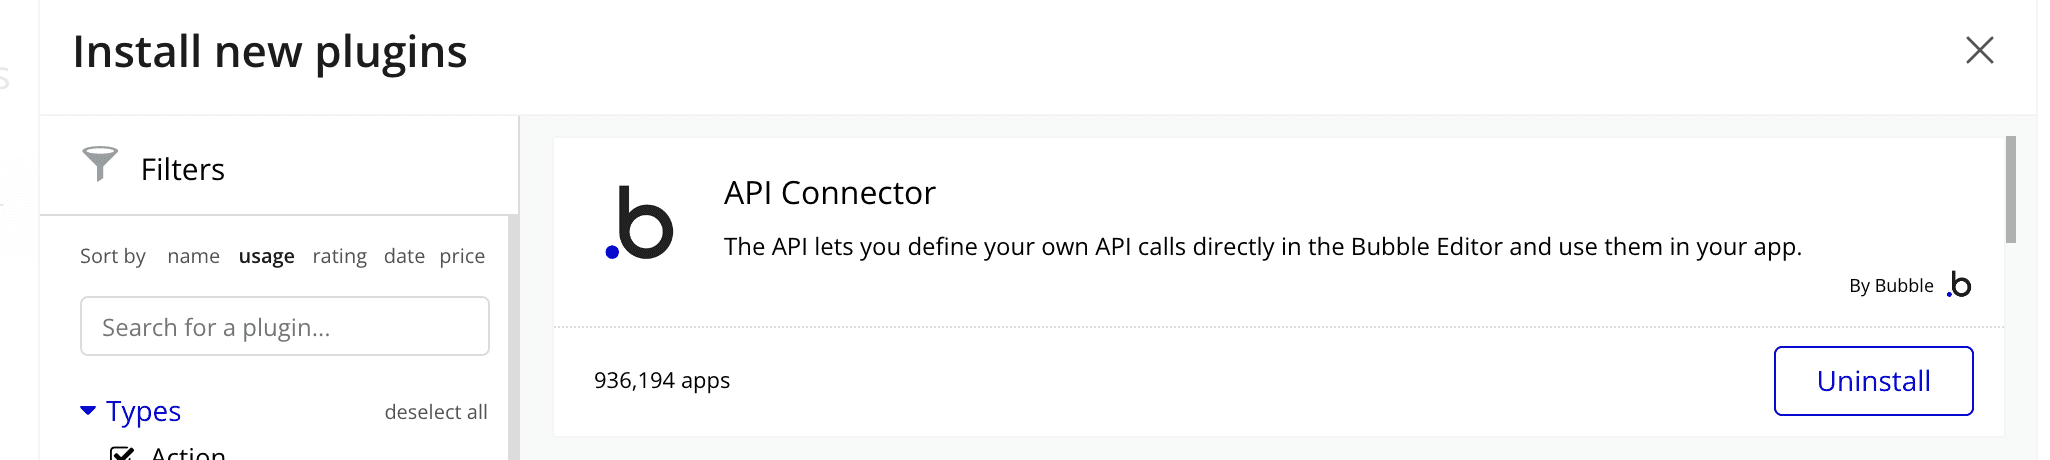
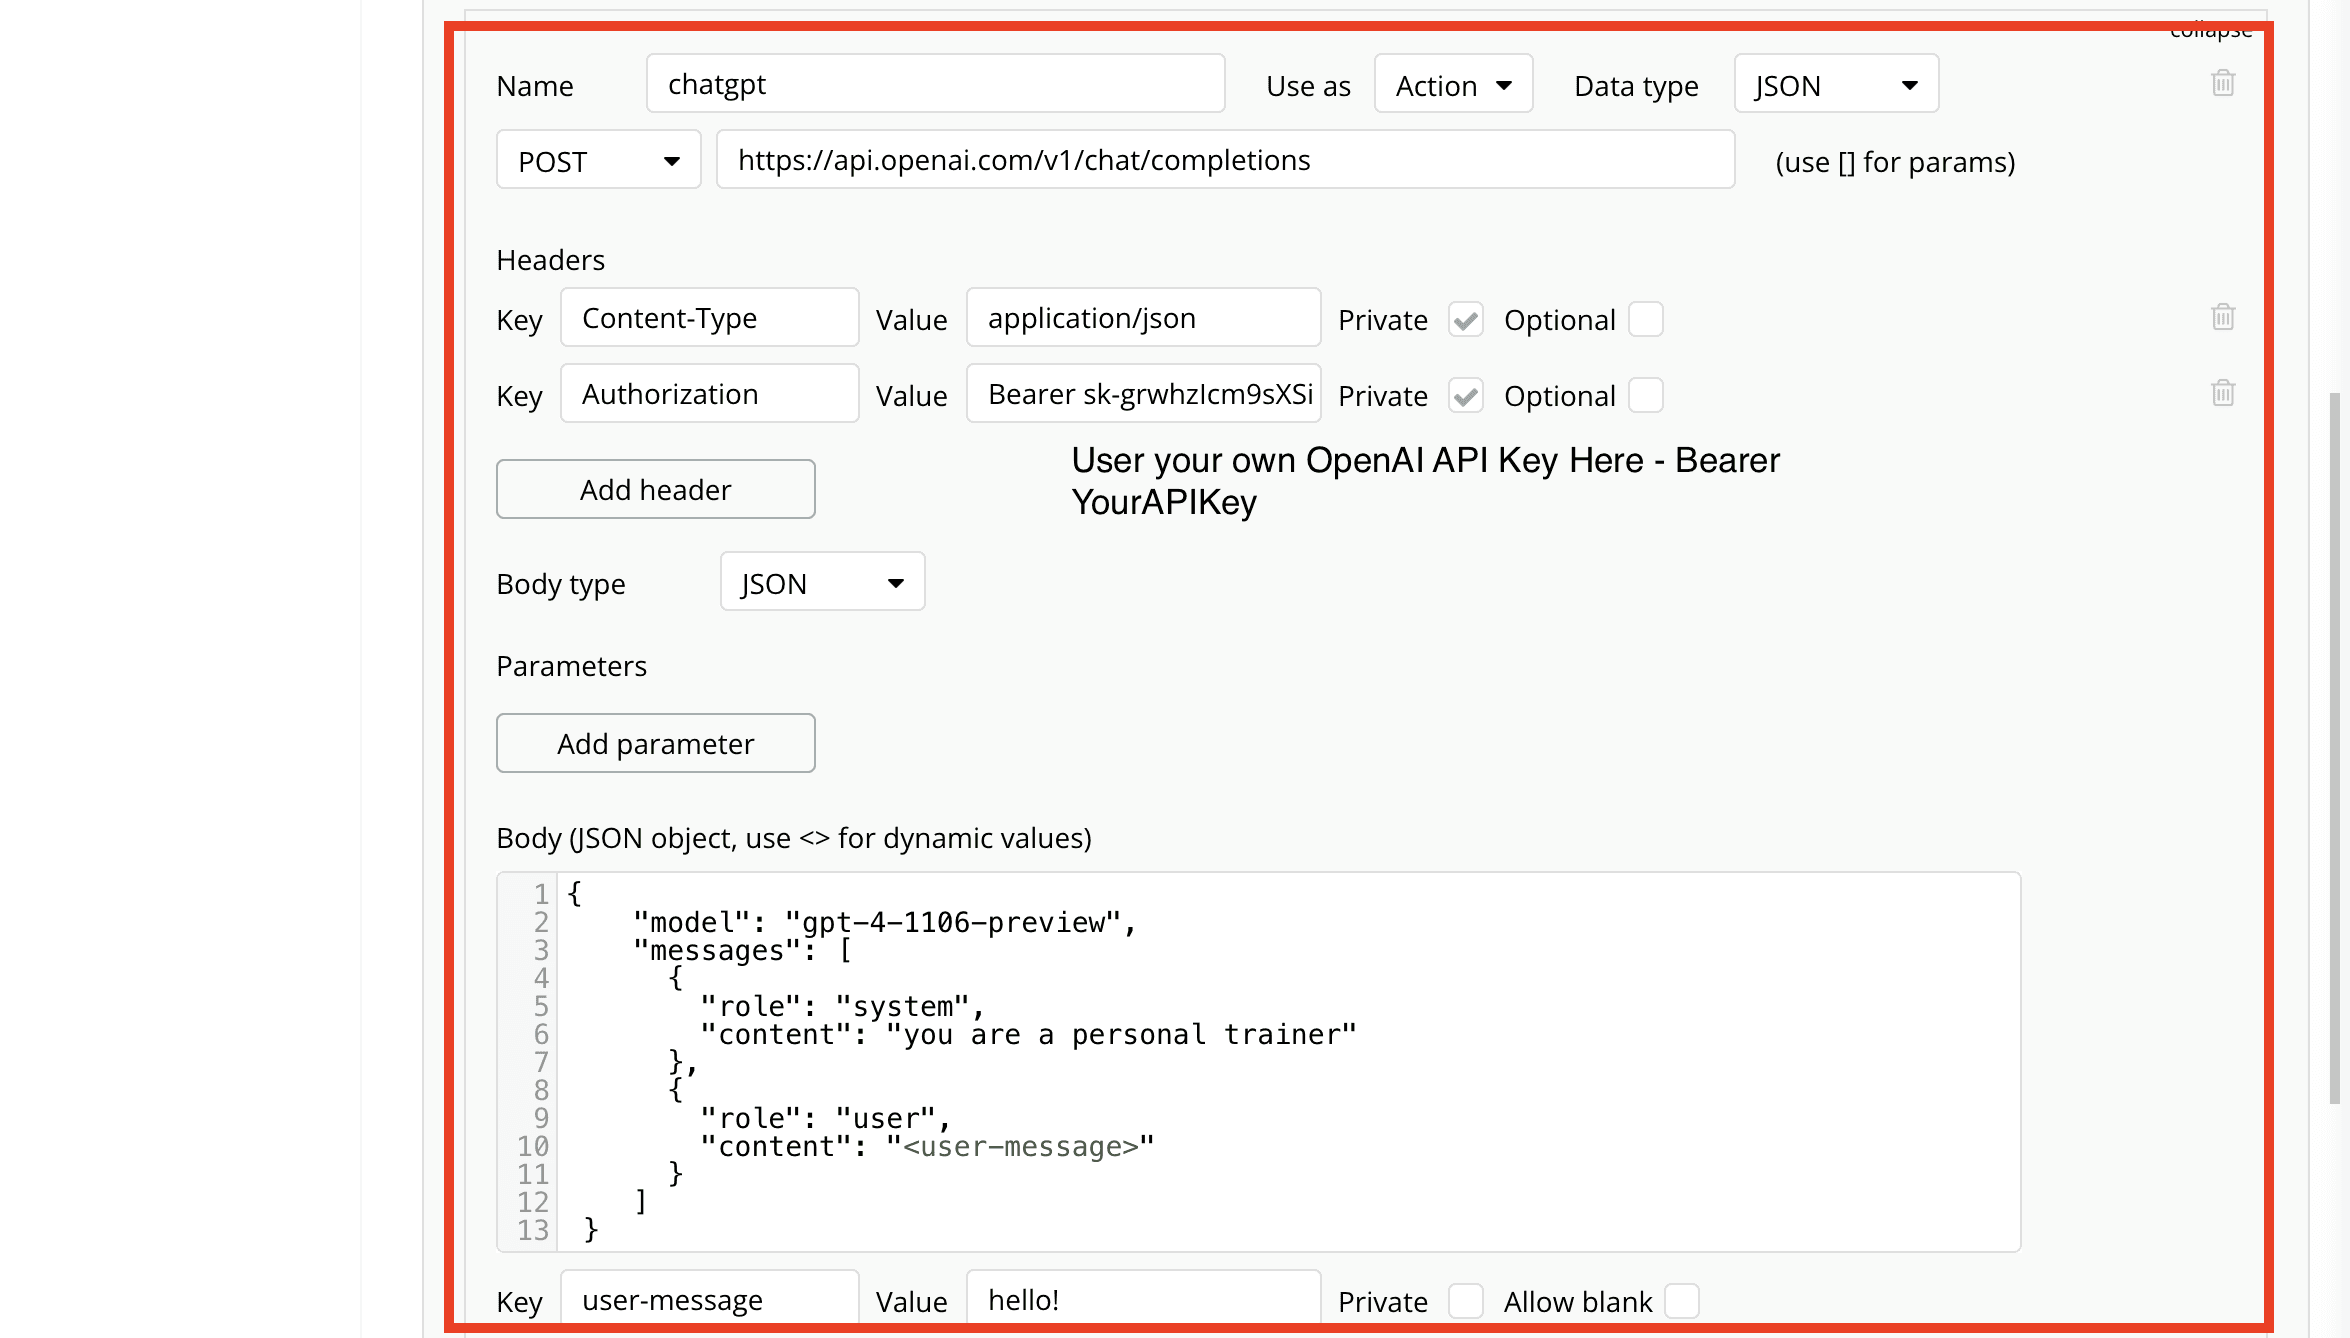
Step 3: Install the API connector in the plugin page, which is what we need to use to connect to the OpenAI API.
After the installation, open it and create a new API called ‘OpenAI’ and enter the API key that you generated previously from OpenAI in the Password field below.
Step 4: Follow the OpenAI documentation, create a 'completion' request call, keeping in mind to follow the exact setup from the OpenAI documentation to ensure the call is successful.
For the prompt section, you can give any prompt you like based on the type of app you're building, or you can let your user determine the prompt by passing the dynamic value.
If you want to pass a dynamic value for the prompt, use the '<>' column, as this in Bubble.io means 'dynamic' field, which means you can pass data from the frontend to these fields.
Similarly, with the message section, this is where you want your user to pass their message to the OpenAI API, so the AI can return an appropriate answer. Therefore, we need to keep that dynamic as well.
Database set up
So now in the database, you want to create 2 data types:
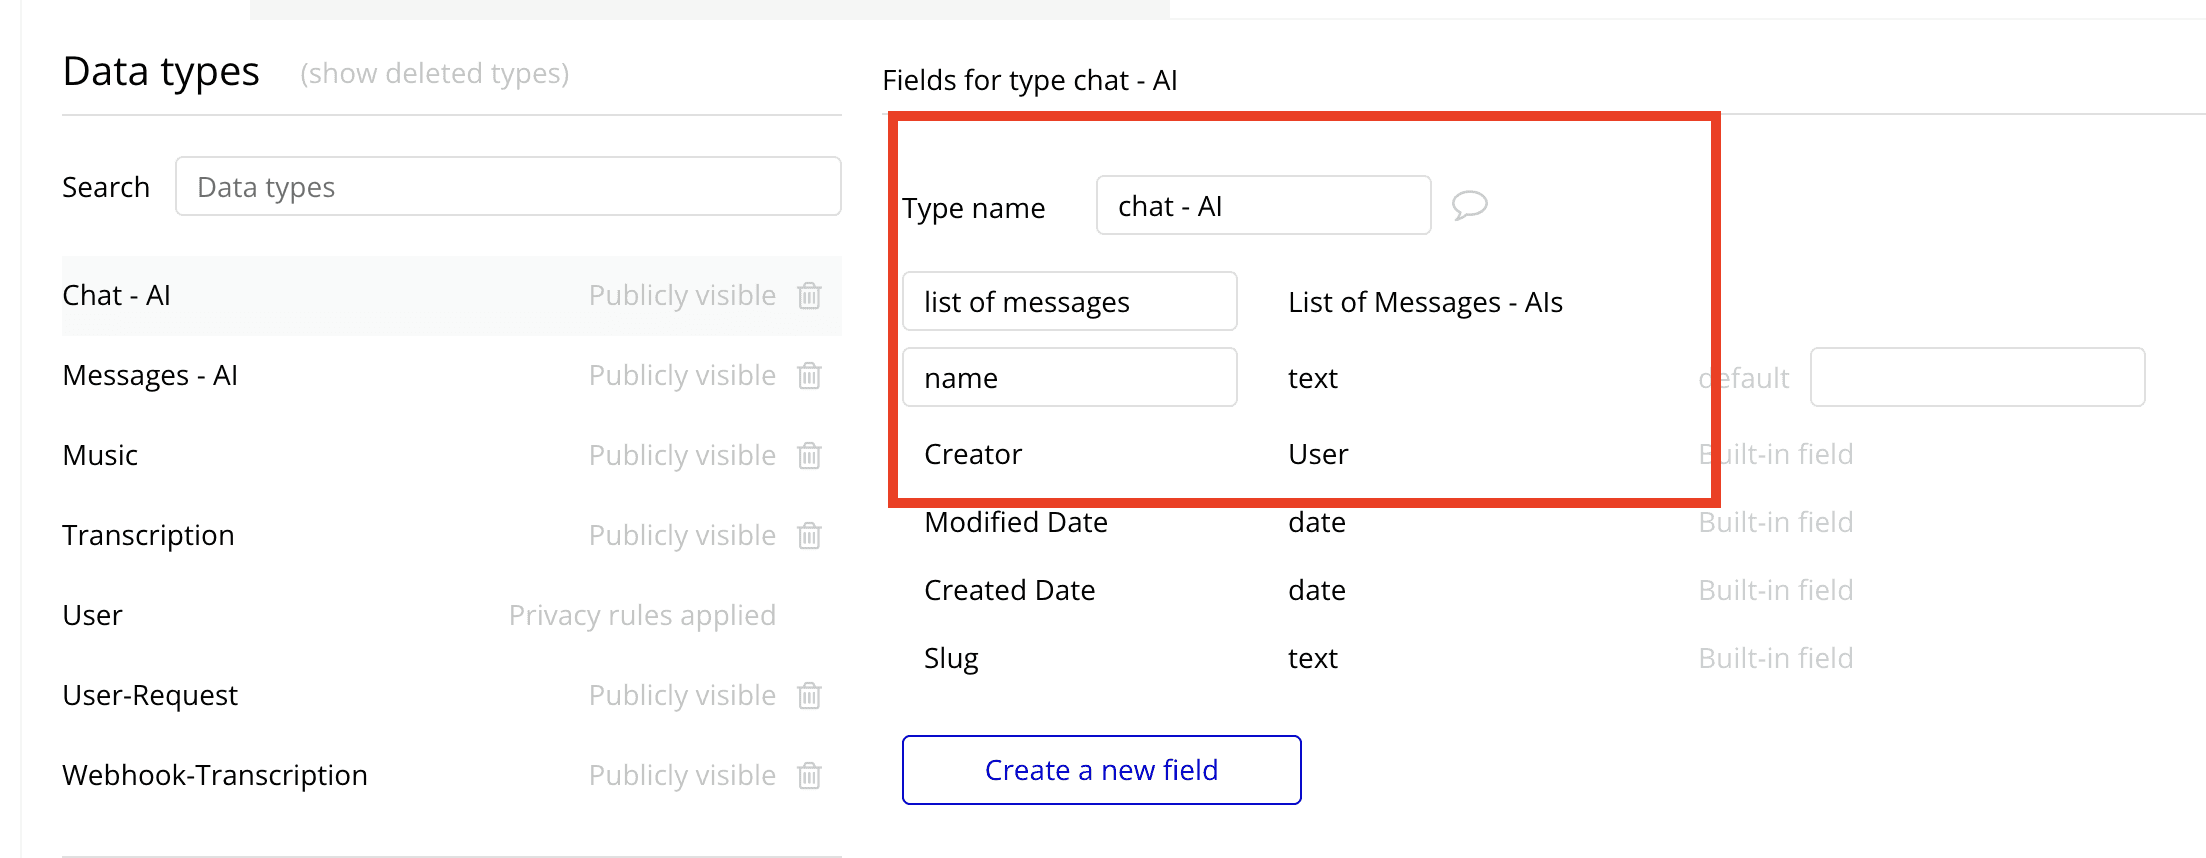
Datatype 1: Chatroom
The Chatroom database will hold information about each chat session, including a list of messages that belong to the chatroom. This setup allows you to organize messages within specific chatrooms, making it easier to display the right content to the user.
Fields for Chatroom:
Name: A text field to name the chatroom, making it identifiable.
Messages: A list of Messages. This field will link to the Message database and contain all messages sent within this chatroom.
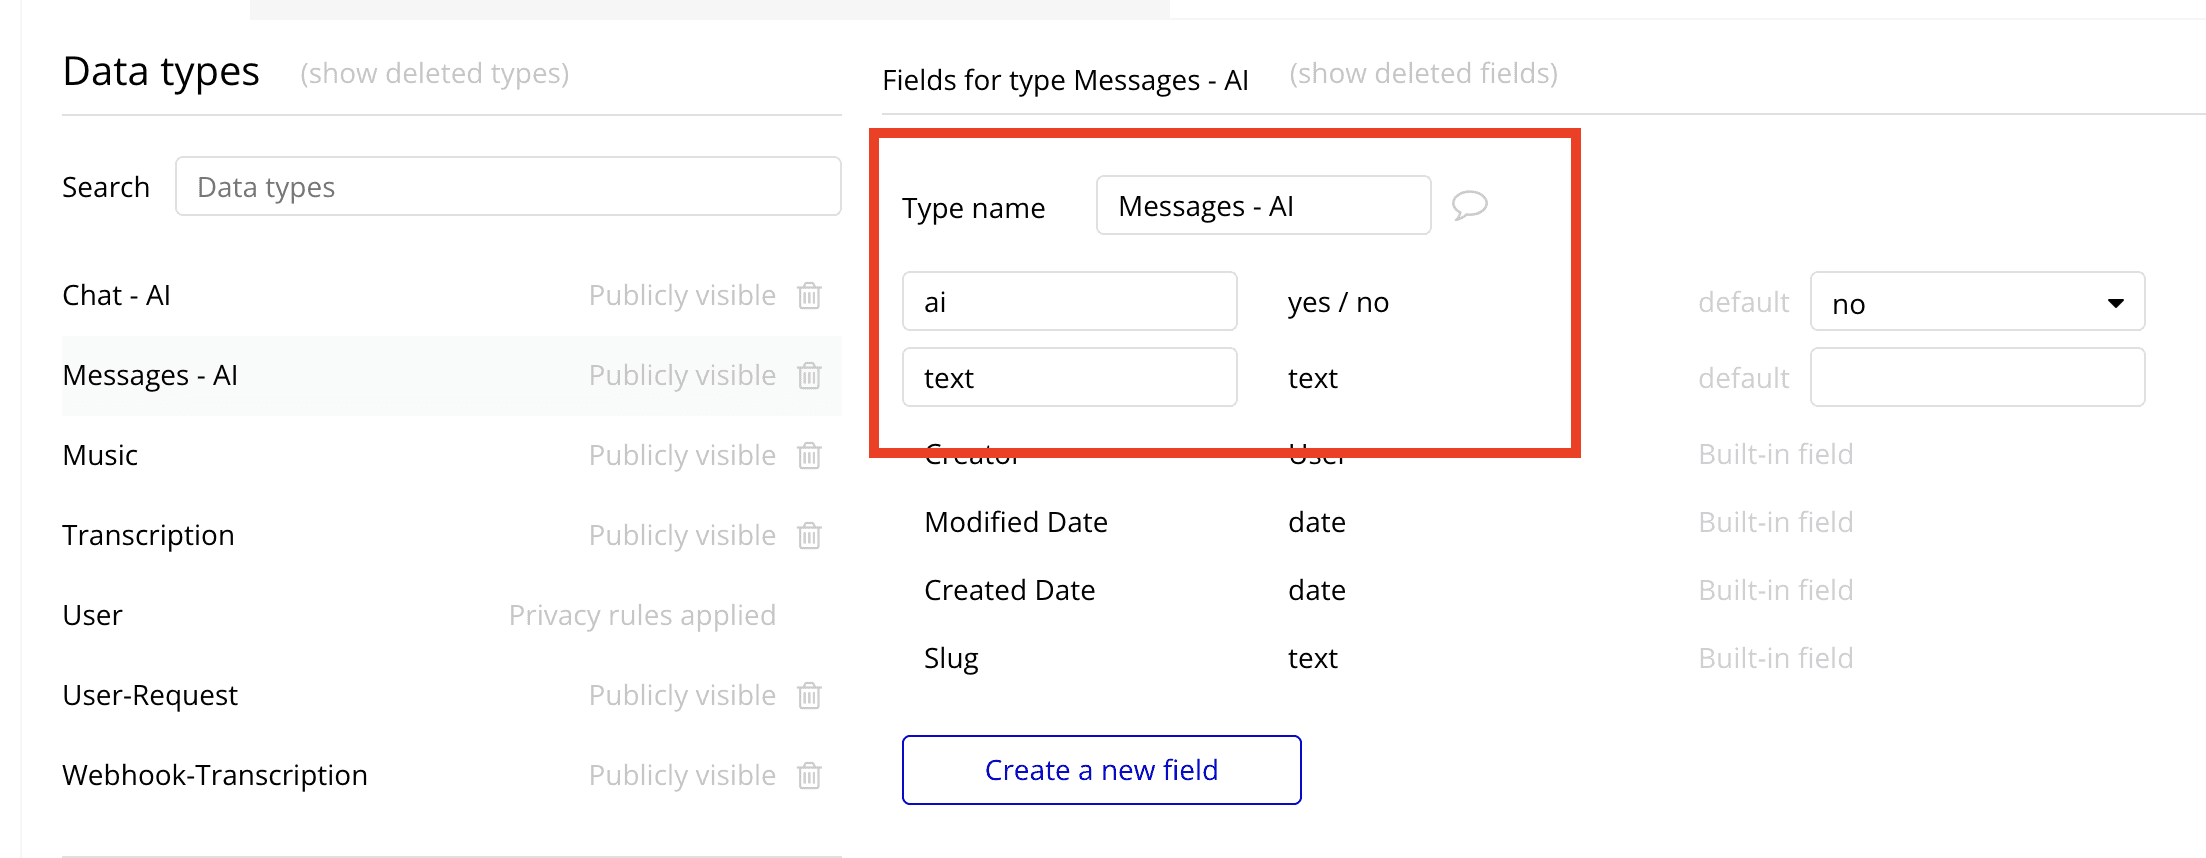
Database 2: Message
The Message database will store the details of each message, including who sent it and whether it's from the AI or a user. This separation comes in handy for UI/UX later on.
Fields for Message:
Text: A text field containing the actual message.
From AI: A boolean field that indicates if the message is from AI. If true, the message was generated by the AI; if false, it was sent by a human user.
Frontend set up
Now let’s set up our frontend and make sure it is functional and looks good to attract users
1. Sidebar set up:
Create Sidebar: Use a Group for the sidebar and a Repeating Group to list chatrooms created by the current user.
Display Chatrooms: Use a Text element inside the Repeating Group to show chatroom names.
Custom State for Selection: Set a custom state (e.g., "SelectedChatroom") on the page for storing the currently selected chatroom.
Chatroom Selection: Add a workflow to update the "SelectedChatroom" custom state when a chatroom is clicked.
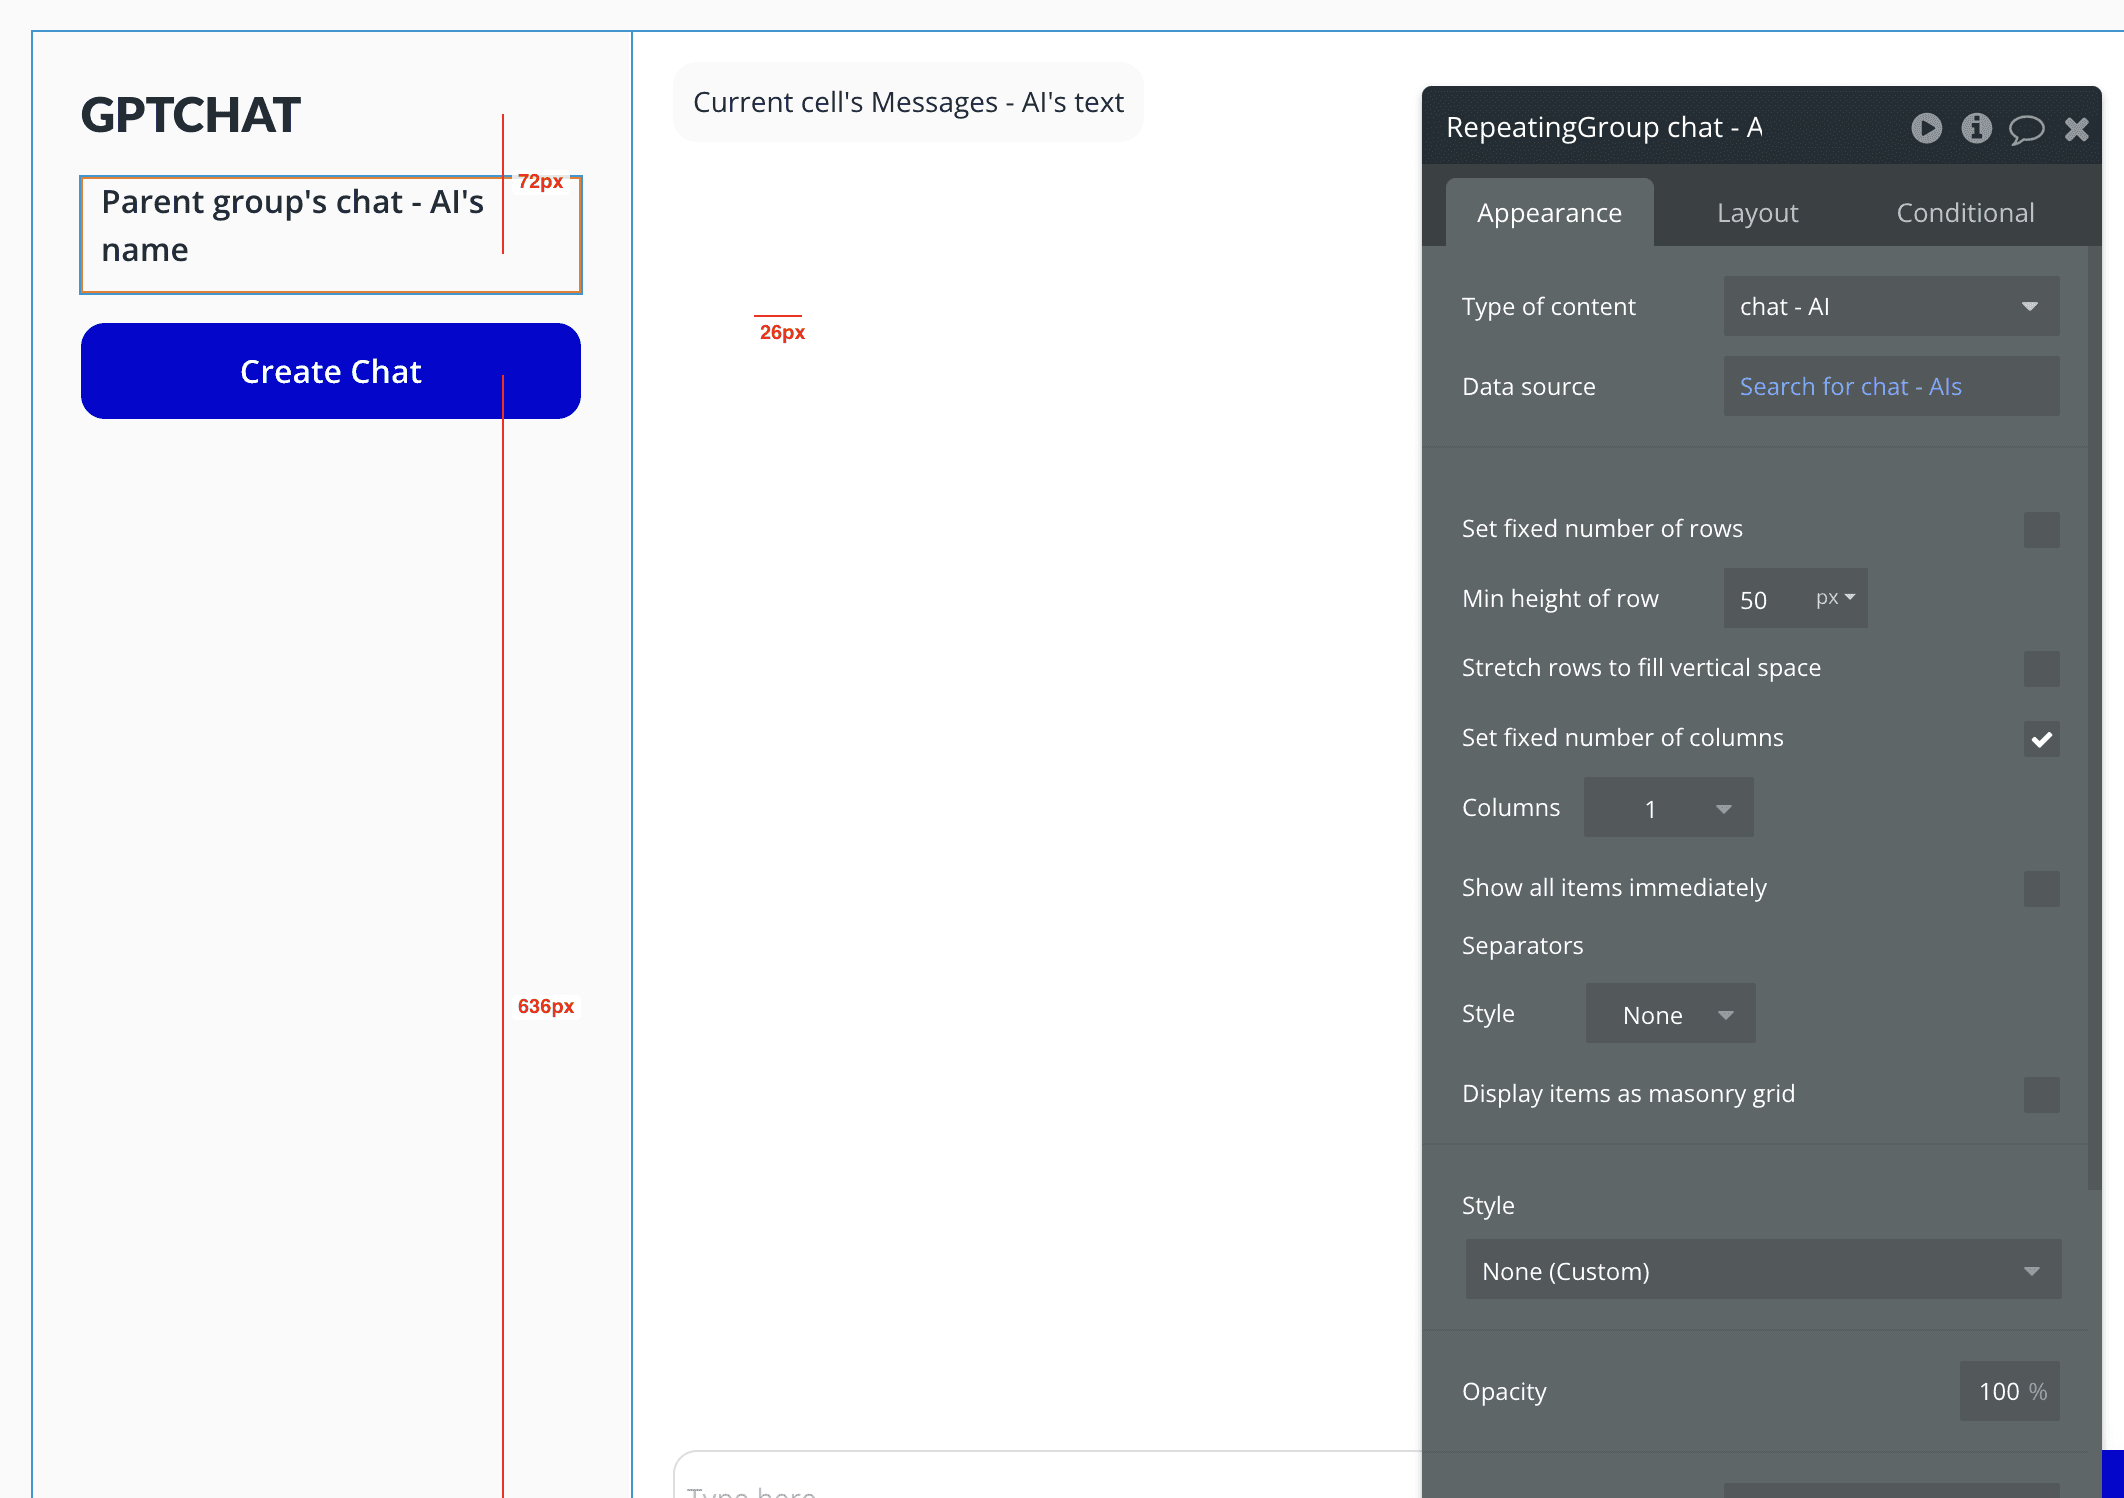
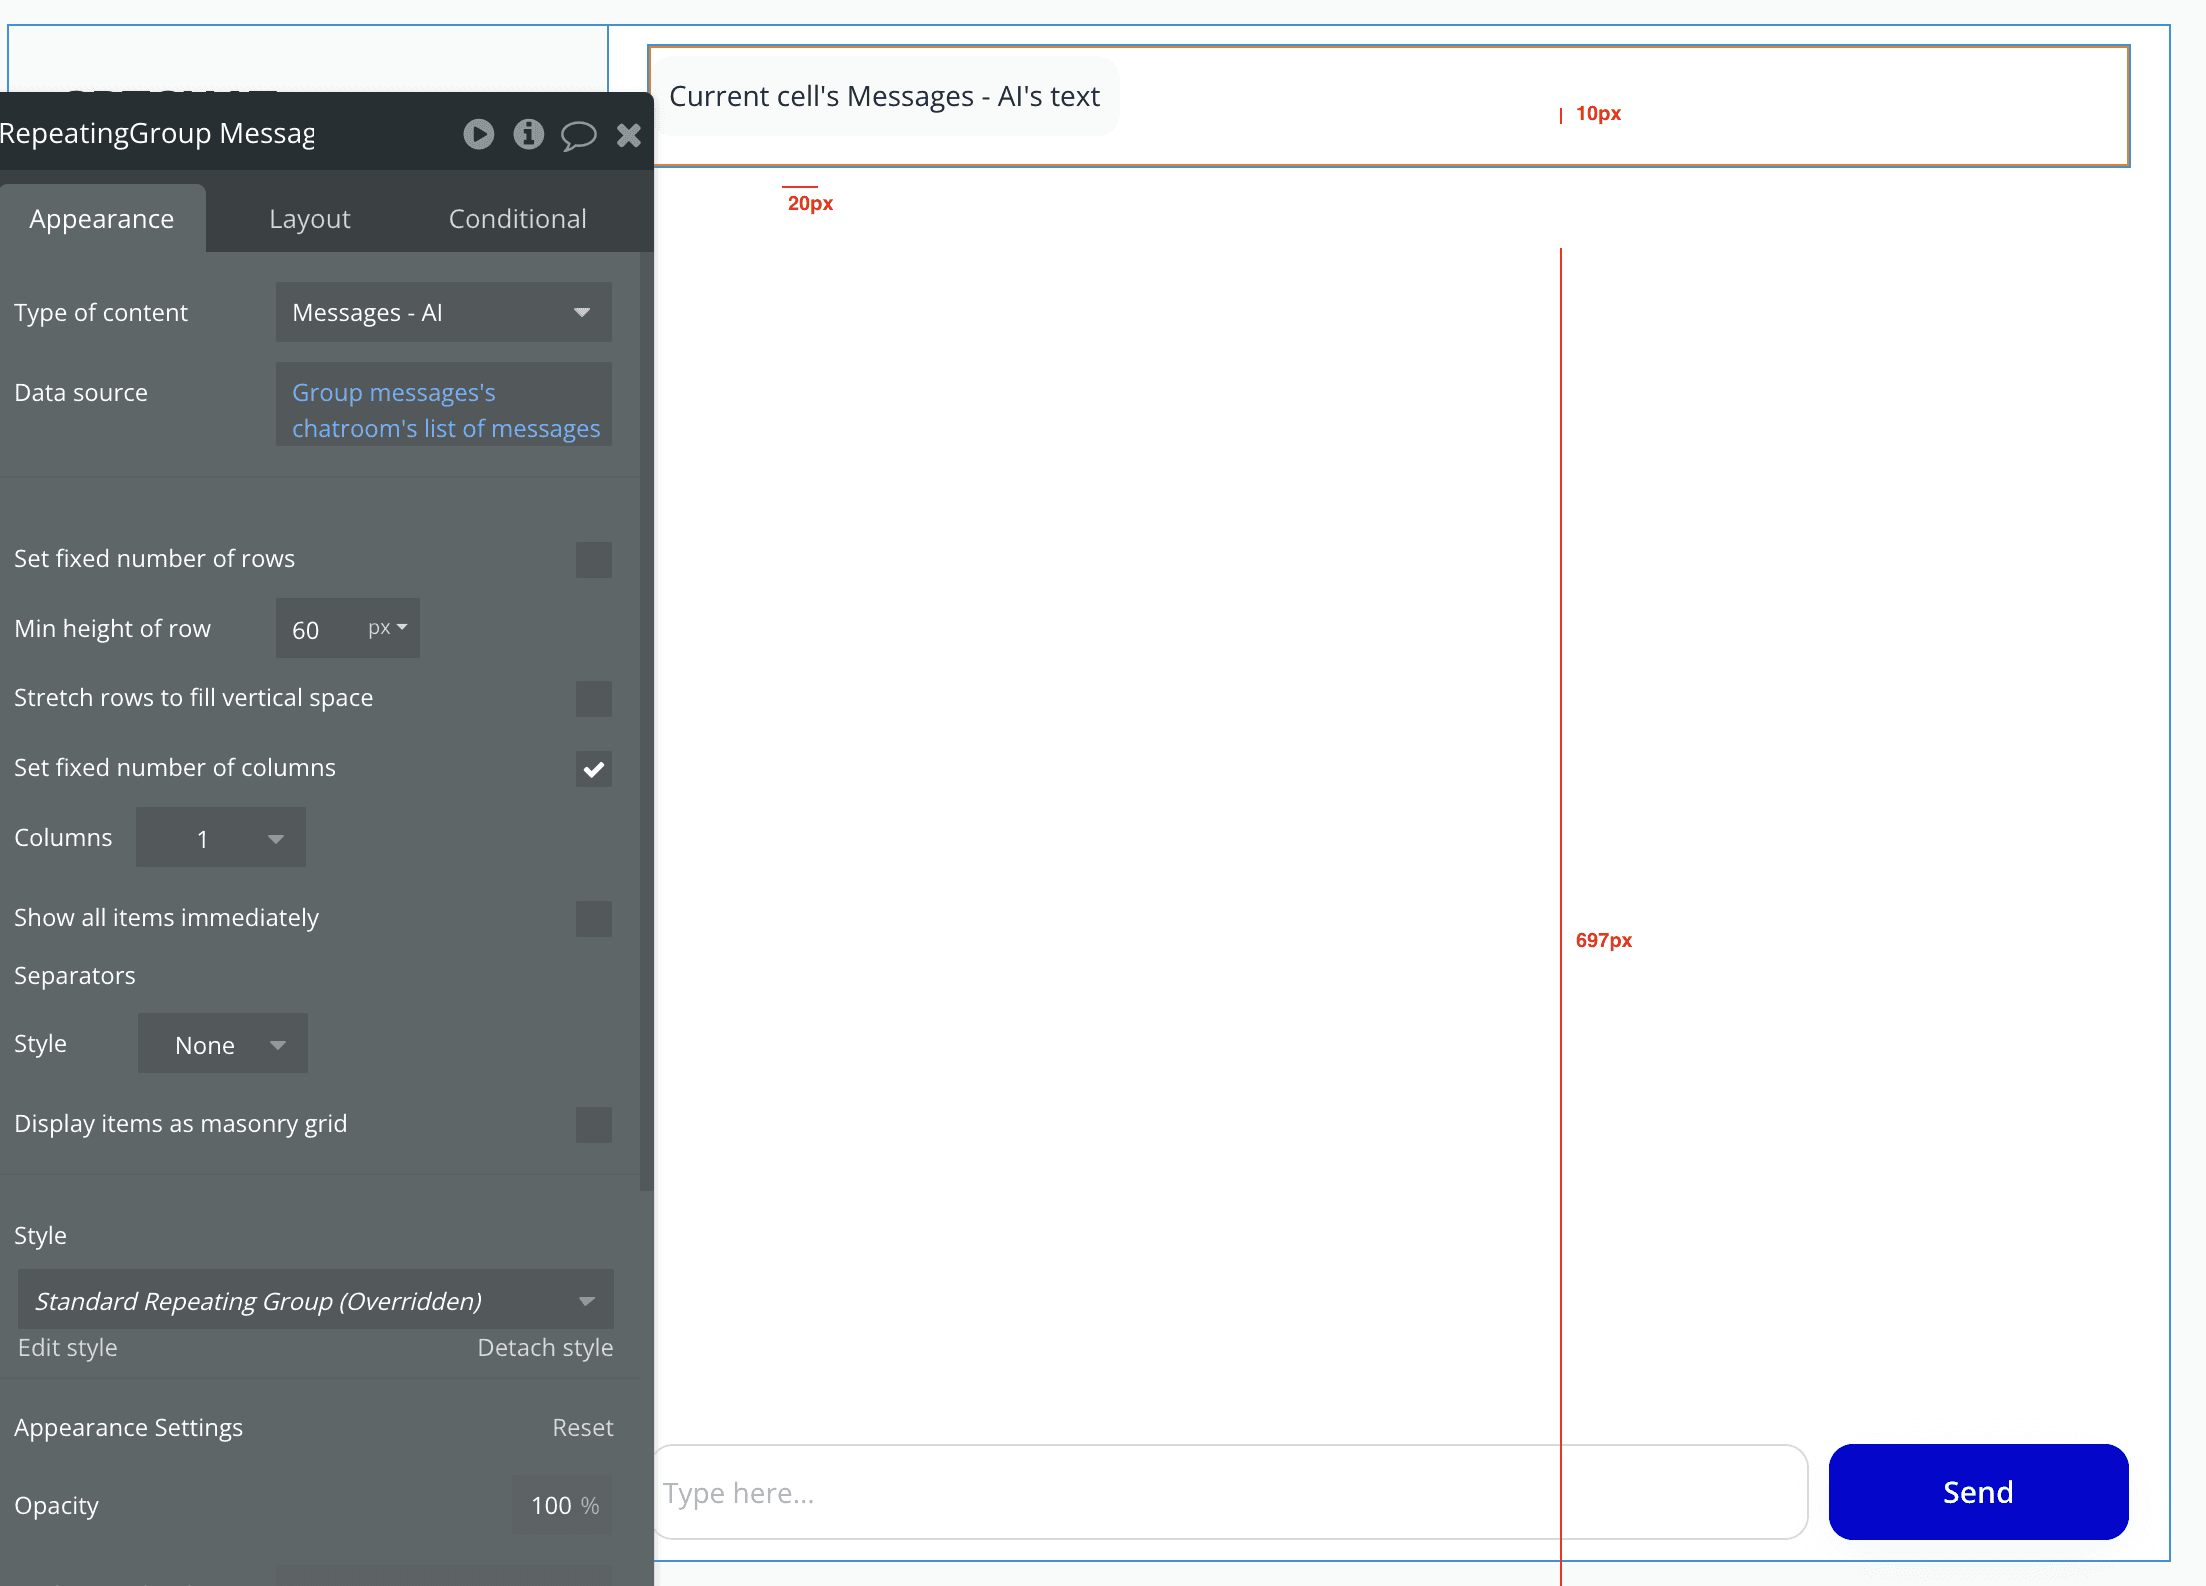
2. Messages Display:
Setup Message Area: Place a Repeating Group to show messages from the "SelectedChatroom".
Source Messages: Set the data source to "Do a search for Messages" where Chatroom equals the "SelectedChatroom".
Conditional Formatting: Use conditional formatting on message Text elements to differentiate between AI-generated messages and user messages based on the "From AI" boolean (e.g., different background colors).
Message Content: Display each message's text content with a Text element inside the Repeating Group's cells.
Workflow set up
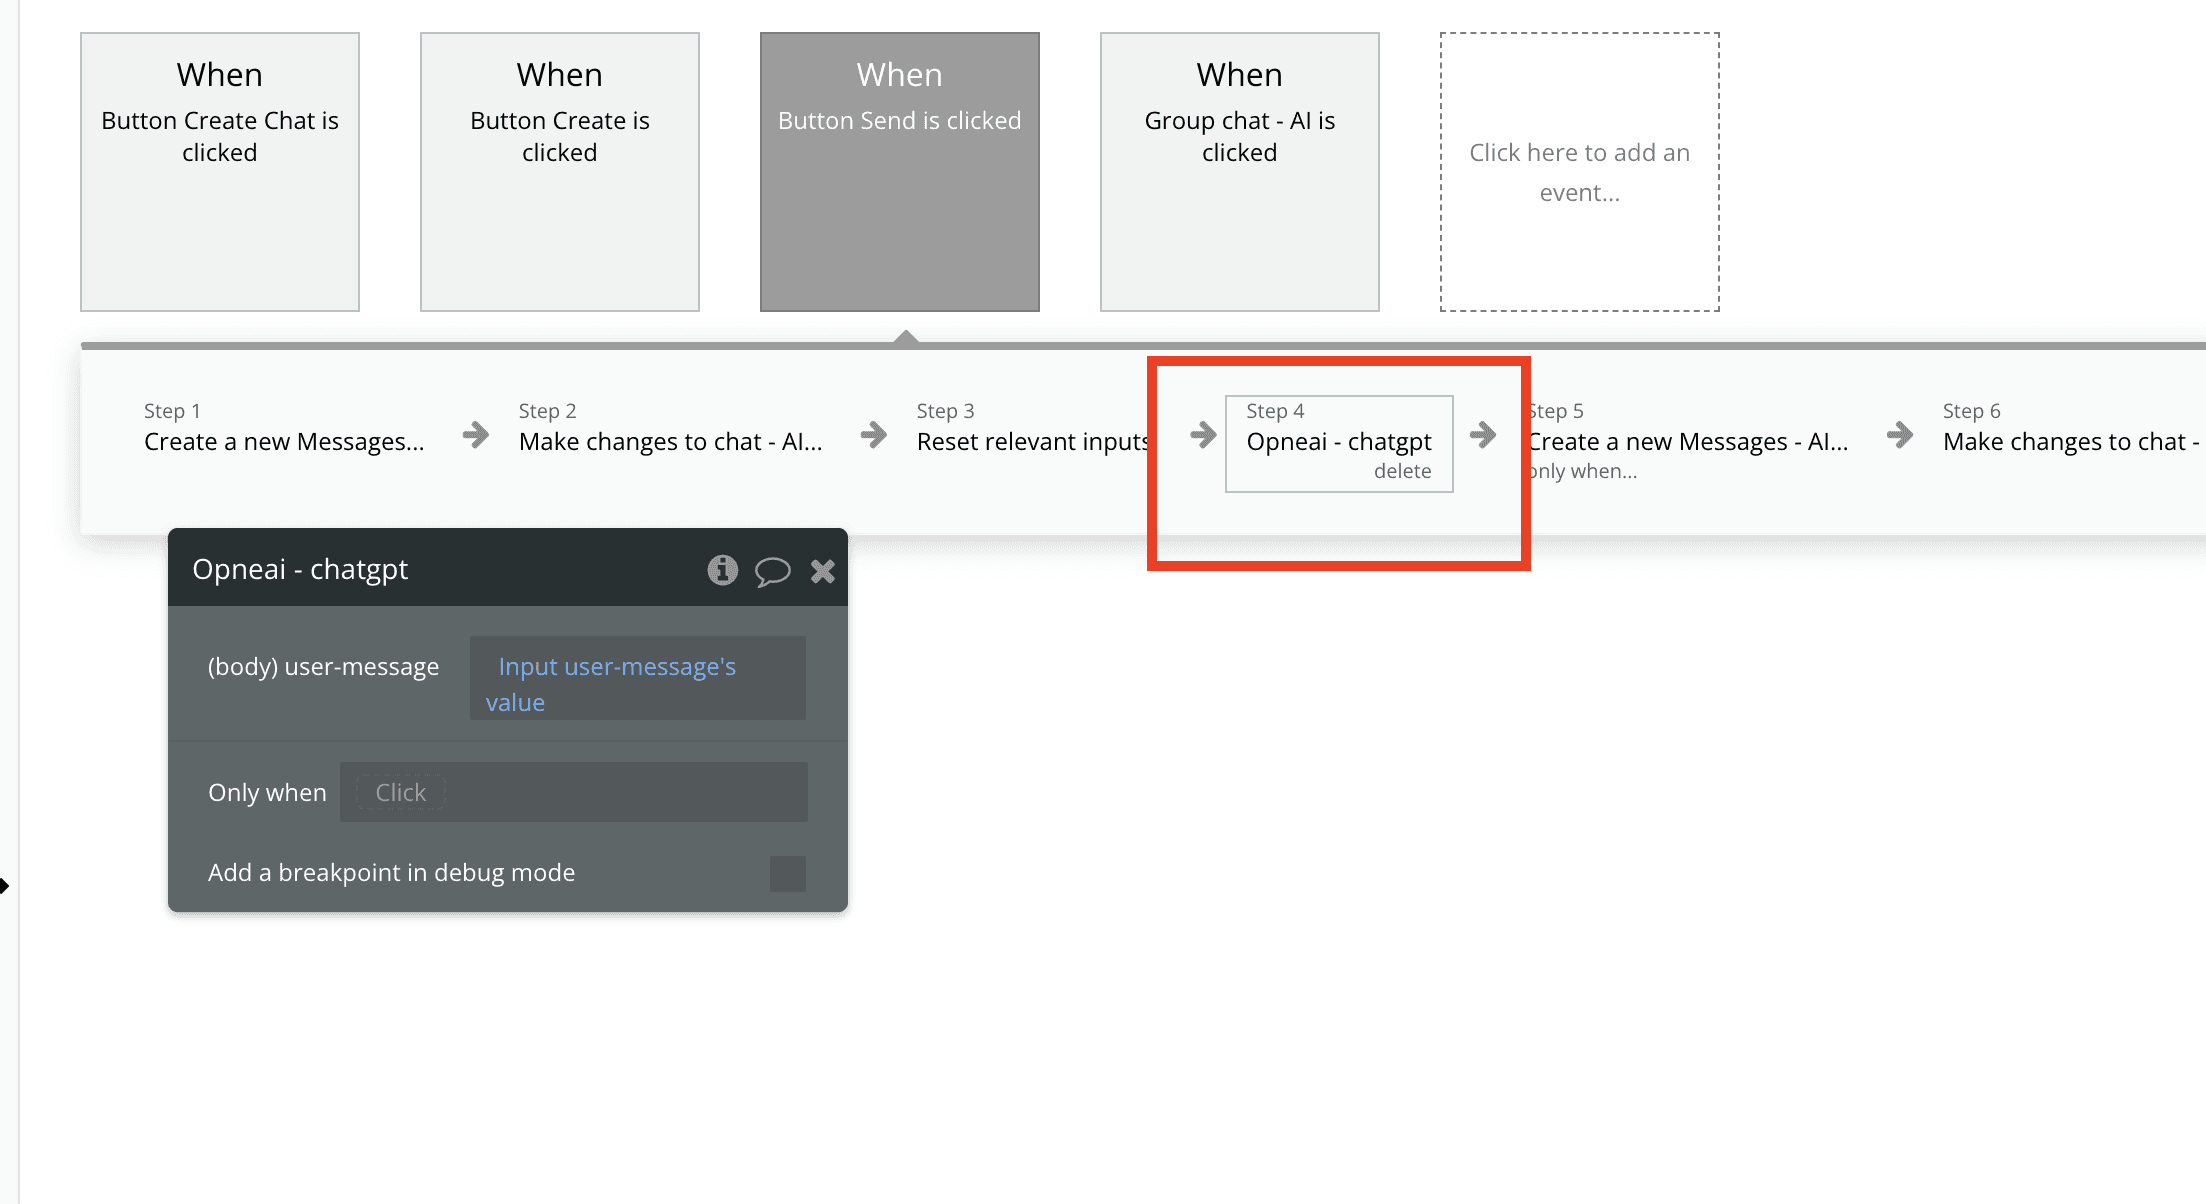
Now, the most important part, on the send button, this is where you want to trigger the OpenAI api, and let it talk to Bubble.io
Step 1: When the send button is clicked, a user message is created, which you'll want to store in the database.
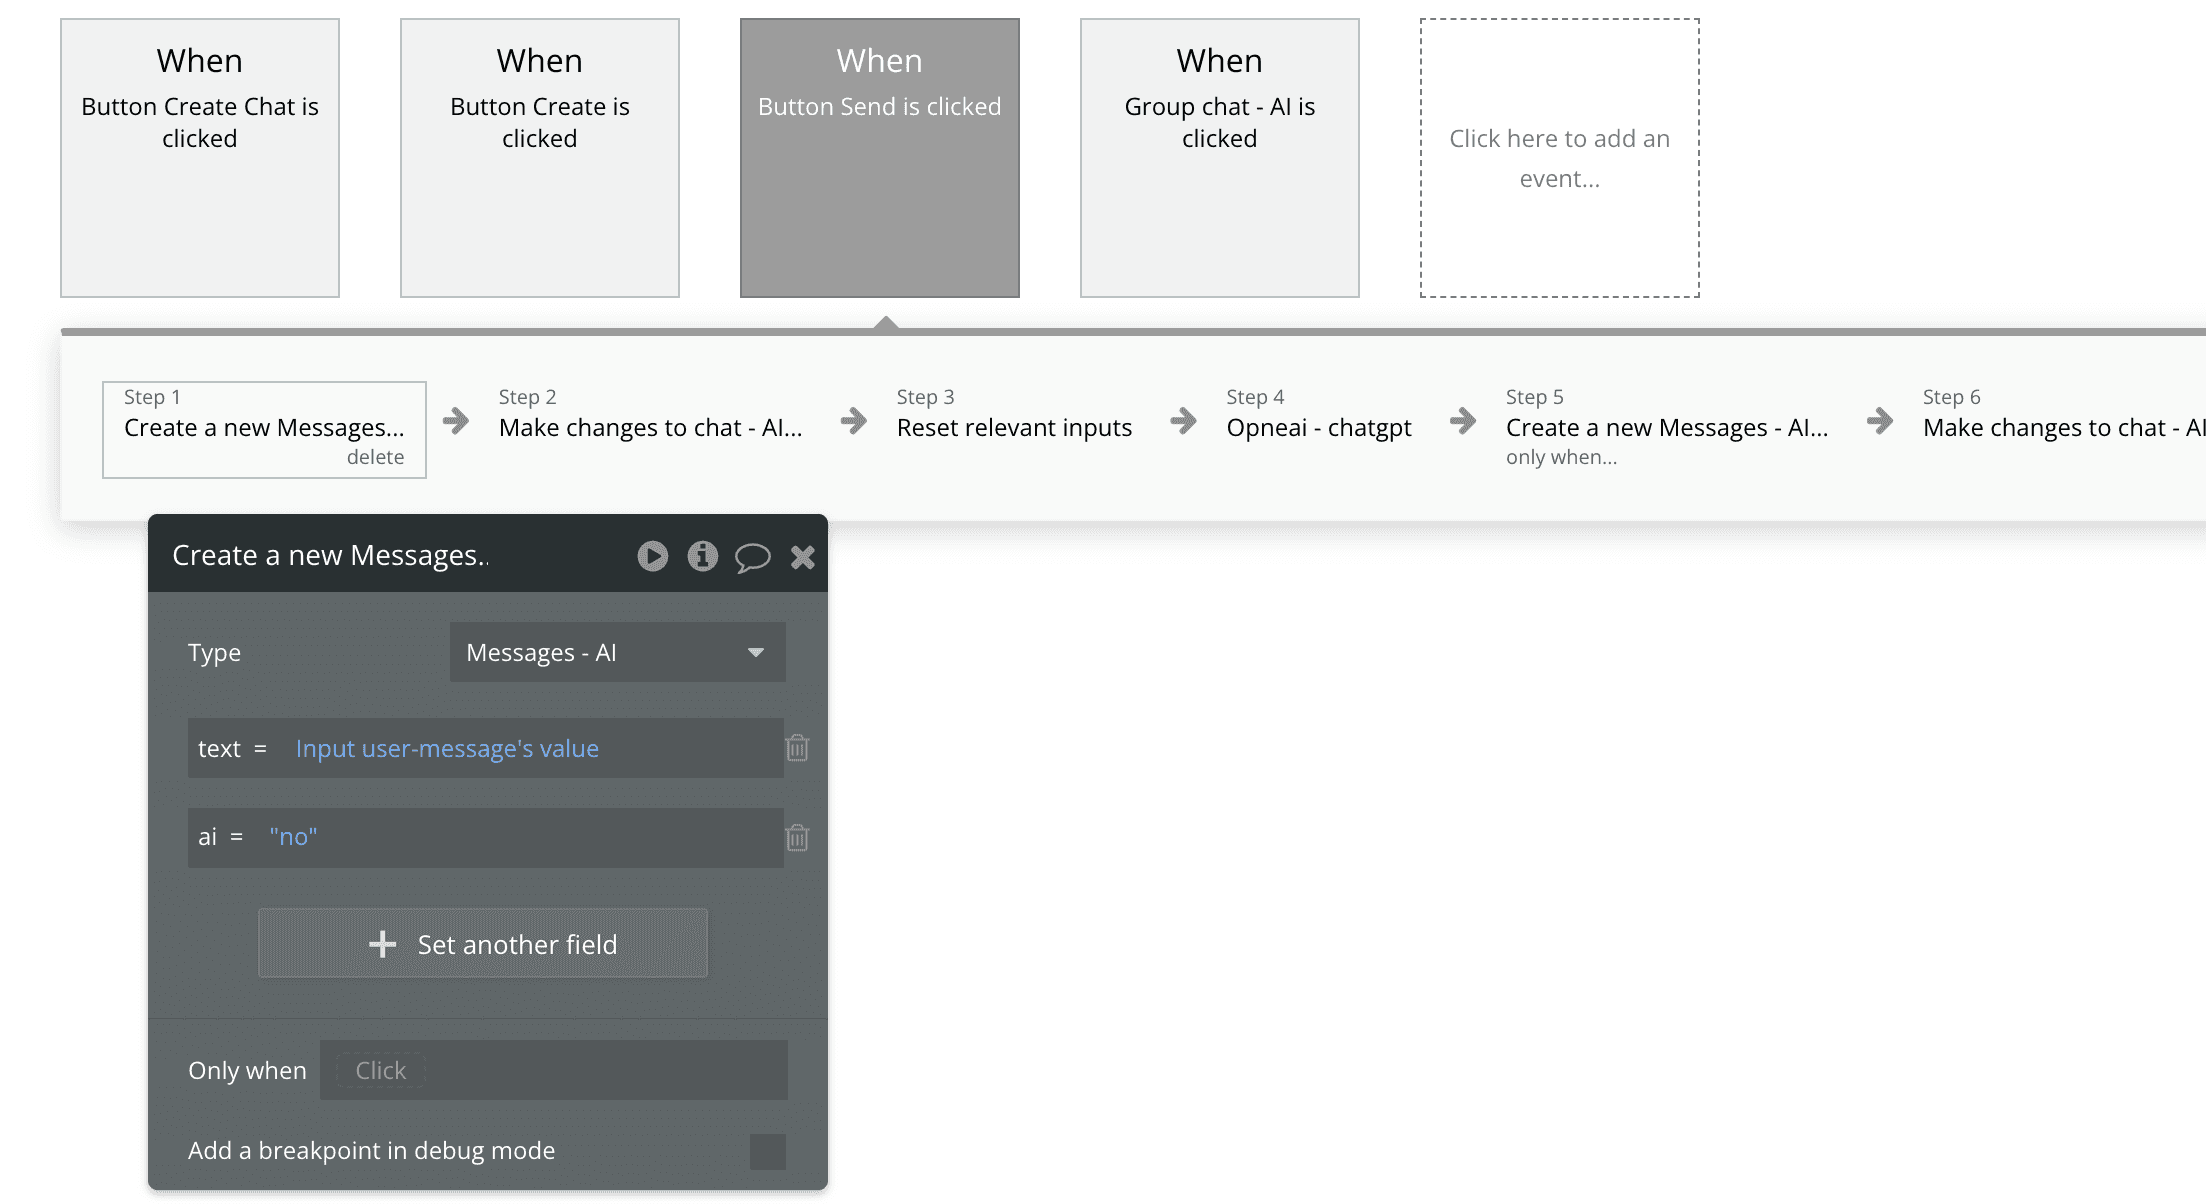
Step 2: Utilize the Completions API you set up earlier. You can forward the user's message from step 1 to OpenAI.
Step 3: After receiving the data from OpenAI, it's time to save this data to maintain a chat history. In the workflow, add a new action following the 'Completion' action. Choose to 'Create a new message', and use the boolean field to indicate this message is from AI.
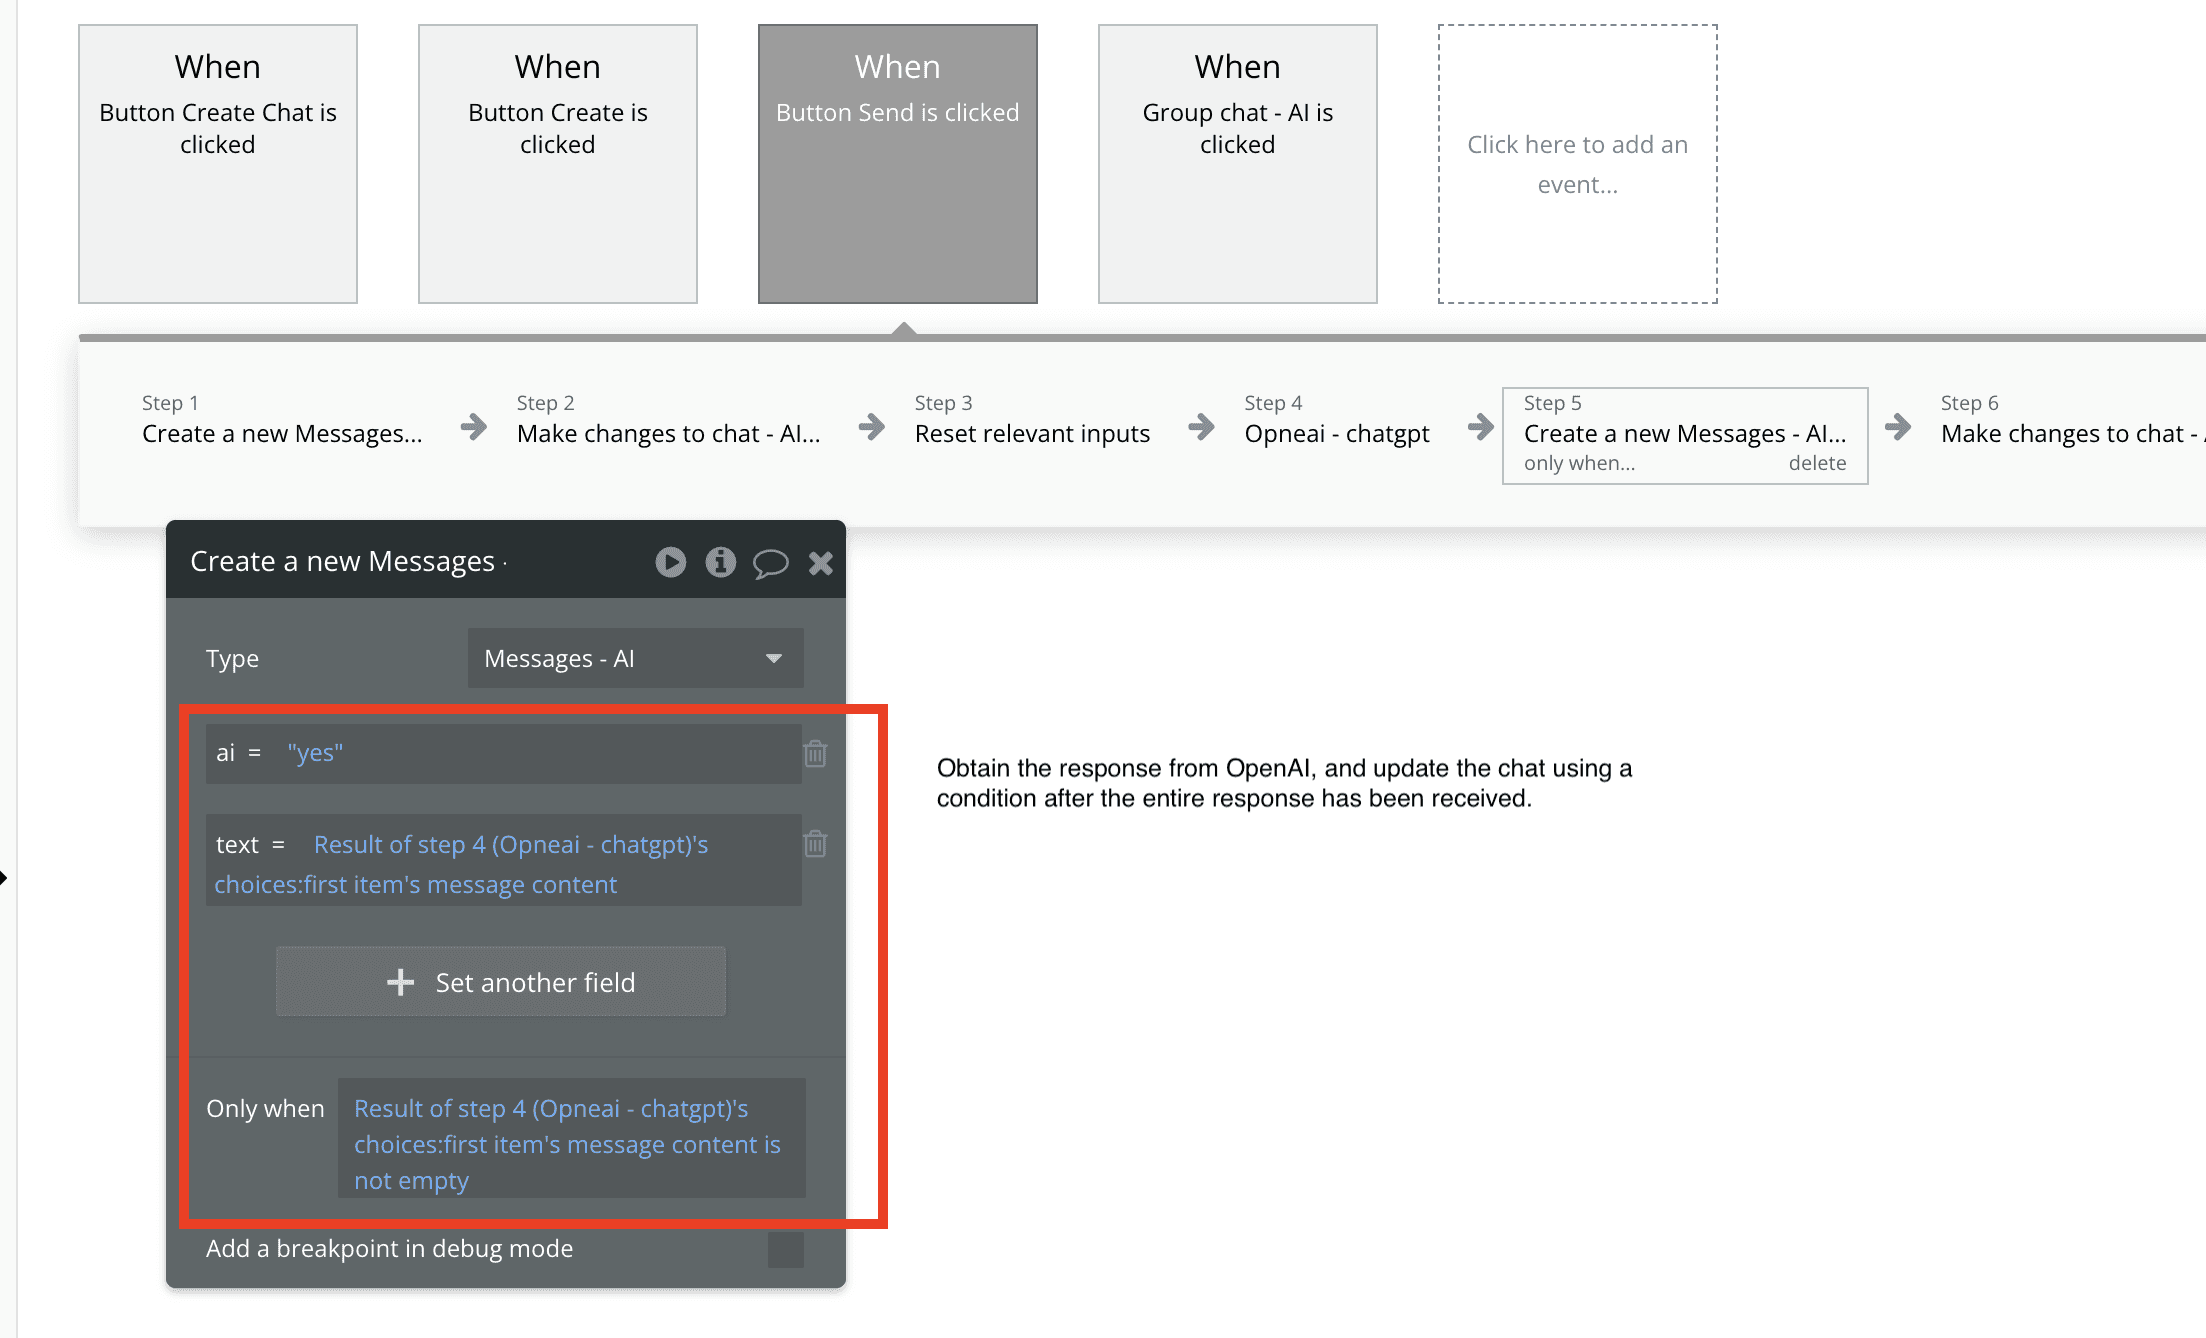
Step 4: Now, with all data saved, review the frontend. You'll see both the user's message and the response from OpenAI displayed perfectly.

Congrats, now you have an AI App! And it took one or two hours to complete, and not months! Thanks to the power of no-code tools such as Bubble.io!
What else can you build with Bubble.io and OpenAI?
AI Content Generation Tool: Leverage the power of OpenAI and Bubble to generate different types of content, such as blog posts, cover letters, and Facebook ad copies, by using tailored prompts. You can allow users to pay a subscription fee to access these services.
Personalized Recommendation Engine: Utilize OpenAI’s algorithms to create a recommendation engine that suggests products, services, or content to users based on their interests and behavior. Businesses could pay to integrate this recommendation engine into their website or mobile app.
AI-Powered Fitness Trainer: Use OpenAI's algorithms to generate personalized workout plans for users based on the equipment available, their fitness level, etc. Users can select the equipment they have, which is then passed to OpenAI's prompt to generate the workout plan. Users can pay per workout plan.
Chatbot for Customer Service: Develop a chatbot that uses OpenAI’s natural language processing to provide customer support for businesses. Users could pay a monthly fee to use the chatbot on their website or social media channels.
Subscribe to our newsletter!
Subscribe to our newsletter for weekly no-code tutorials. It's completely free!
Need help with Bubble.io?
Also, if you're looking for someone to build your app, you can contact me at max@shipfast.agency.